
Posted by Pure E-Liquids on 3rd Feb 2021
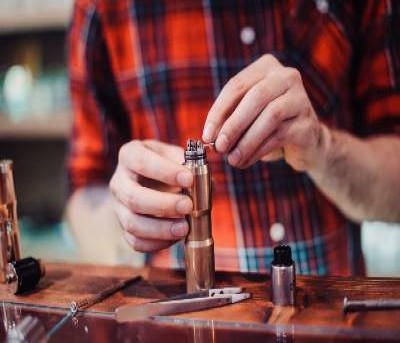
What kind of vaper are you? The type who likes to get involved with a ‘Do It Yourself’ approach, changing the coils, wick and everything in between to get the optimum performance from your vape.
Or do you want little fuss and no fiddly components to deal with?
Coils are a vital component of any device and there are two key types - replaceable and rebuildable.
Beginners and intermediate vapers will want no complications.
Cleaning by rinsing out your tank is advised when switching between e-liquids, but in most cases regarding your coils, switching them out for new ones is the best tip we could give.
Even if you’re a more experienced vaper with a practical mindset, you’ll still understand that consistent flavour is everything.
So much can go wrong when you try to clean the coils and tank manually yourself.
Allergic reactions to cleaning products, alcohol poisoning should you use vodka and not clean effectively - the list goes on.
A failed attempt can often determine whether vaping is a useful cessation tool to quit smoking or just something you try and quickly put down.
Just imagine the scenario below and you’ll understand which category you fall into and how you want to fix the issue.
Disaster strikes - the flavour is beginning to go in your vape, or it suddenly starts to develop a burnt taste.
Perhaps even both. These are common issues with your device, which can happen due to multiple reasons.
However, once both feel overused, you’ll notice the difference in each draw of vapour.
Whether you’re a seasoned vaper who doesn’t watch the puff counter or a beginner trying something new, the amount you use your device is important.
Also, how often you clean your device plays an equally pivotal role.
While it doesn’t look possible when you see the device in full swing, it can actually be taken apart and cleaned.
You can find some more tips about cleaning Sub-Ohm devices below, but only attempt if you’re confident doing so.
Let’s run through when you should consider cleaning your components, if at all, while dealing with some frequently asked questions by vapers of all levels.
How To Clean Your Vape Coil
You could attempt to give it a deep clean if you have a reusable coil, but would that be worthwhile long-term?
It might prolong the life a couple of days and give it a shiny look, but you will need to replace it soon after anyway.
In fact, it could actually damage the device, including the tank and batteries if done incorrectly.
Because vaping is a technical subject, coils are just one string to the bow. Multiple components work in tandem to produce those smooth throat hits or powerful clouds of vapour.
Some of those key parts are the coil and the vape tank itself.
The former produces the heat to turn that e-liquid into vapour alongside the wick, while the latter stores the e-liquid ready for use.
For replaceable coils, there isn’t much of a cleaning process involved.
Because they generally last between one to three week maximum depending on the amount you vape, the best you can do as a temporary fix is mildly wash away debris with water.
Nevertheless, you’re not likely to get all bacteria or e-liquid off, so it’s often preferred to maximise the coil potential before that burnt taste or gone off flavour emerges.
Having clean coils ready to swap out is best practice for easy vaping on the go.
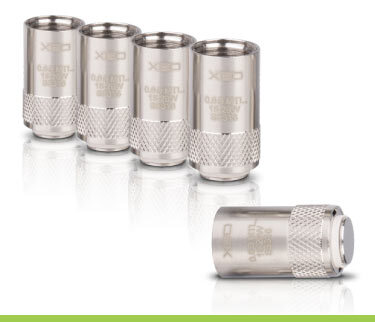
With vape coils from big brands like SMOK or XEO often providing three or five in a pack, this can last you a considerable amount of time, depending on the frequency you vape. Plus, remember safety is a top priority when vaping, especially if you have little knowledge of the subject. A thorough clean is typically done by advanced vapers only with mod devices providing the opportunity to use rebuildable coils. If this applies to you, follow the steps below:
- First of all, you must take apart your device, removing the coil from your vaping device.
- Take out the batteries too, as well as the tank.
- It helps when you take the device apart to take a few camera snaps or even a video to remember how it goes back together (just in case).
Now, because e-liquids are naturally sweet from a mixture of ingredients such as Vegetable Glycerine (VG) or Propylene Glycol (PG), debris, dust and thick sweeteners can naturally build up. This is part of the issue that damages your coils and affects your vape flavour or production levels. The same applies to the remaining e-liquid left in your tank. What you need to do is wash all these parts out by cleaning them regularly. Before you can do all of that, it’s important to know how to disassemble your device.
Taking Apart Your Device - Step by Step
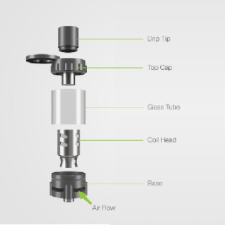
Removing all the necessary parts of your vape carefully is essential for cleaning and keeping the device in a workable condition. With a Sub-Ohm tank for example, you have the following components:
- Drip tip or mouthpiece
- Pyrex tube
- Coil
- Airflow ring - but only if you have airflow holes
- Top cap split into two separate parts (cap and tank side with slot to fill)
- Alternatively, can also get top cap with slide fill or hinged
- Some have mouthpiece instead of drip tip
While it might look simple on YouTube videos offering demonstrations how to take apart your vape, for beginners the task may be daunting. Is it really worth the risk of breaking your device by overcomplicating the finished product? Should you feel it’s necessary, here is how you go about it with a Sub-Ohm tank:
- Hold the vape base firmly, while unscrewing the top cap.
- Remove the drip tip or mouthpiece but be careful not to lose the connected o-ring which is designed to prevent e-liquid leakages.
- Place the Pyrex tube in a safe place.
- Finally unscrew your coil which is either connected to the top cap or the base.
Deep Clean Your Vape
The last thing you want is the remains of a Platinum E-Liquid with a Tobacco flavour lingering with your new fruit flavoured e-liquid. We’ve all been there! Cleaning your coil can be done in several different ways, but the method depends on how much time you have. The other trick is doing it well enough without putting your health at risk. Bear this in mind if you decide to use the products below, ensuring it’s suitable for your vape and thoroughly cleansed before use. Let’s run through the best way to deep clean:
- You can pick between two methods initially. With Soak, pop the key elements of your device in ethanol, cheap vodka or even vinegar for a few hours as a deep clean. Cover them with a towel to stop evaporation and speed up the process. Or for faster results, scrub the key bits of debris and build up with a cloth containing these substances.
- Once your soaking is complete, rinse the coil, tank and other parts with warm water for 20 seconds.
- You could brush away any remaining debris with a toothbrush or microfibre cloth. Some vapers use this method for general maintenance, but do so very lightly with care to avoid damaging any part of your device.
- Allow each part to dry, laying them out separately on a cloth or kitchen roll, but not in direct sunlight to avoid damaging your device.
- Once they are completely dry use a paper towel or kitchen roll again to apply in a twisting motion through the device. Alternatively, you can hold the paper at the base of your device and blow into the open end to push the remaining particles out of the airflow holes.
How Long Should I Let My Vape Coil Soak?
There is no right or wrong answer. Soaking depends on the amount of time you have before using your next e-liquid. You can start by leaving your device for up to ten minutes to soak the parts individually. However, if left to soak for a few hours, expect better results and the easier removal of certain stains.
How Long Do Vape Coils Last?
Although you can clean coils and tanks, this will only prolong the life of them briefly.
Understand that if the coils are burnt beyond repair, no amount of cleaning will help.
If discolouration or that burnt taste persists, seek a replacement immediately.
With a multipack of compatible coils for your device, a burnt coil is no longer an issue.
However, if they’re generally just dirty, which is common, you can wash a few times before needing to swap for a new one.
How well and frequently you maintain your vape will significantly reduce the need to swap coils often.
One way to do this is by always priming them before each use of your chosen e-liquid.
A few drops into the wick will help for greater saturation and to avoid burning or overheating your coil.
How Do You Remove Gunk From the Coil?
This can often happen to rebuildable coils, because advanced vapers tend to go with thicker and higher ratio VG over PG e-liquids, sometimes even 100% VG for the ultimate cloud chasing experience.
To try to remove any gunk from your coil before giving them a clean, which is instructed above, dry burn them briefly.
In most cases, the heat alone without any e-liquid left in the tank will burn off the majority of gunk build up.
Remember first to take out any wick before doing this, then let it cool down after and re-add the wick once done.
Bear in mind for Sub-Ohm tanks removing wick yourself can be rather tricky and is typically done more with RDA devices.
However, if you want to ensure a clean taste guaranteed and not risk damaging your device, stick with replaceable coils for Sub-Ohm devices, which will have less gunk because you don’t need to clean them as thoroughly or use them for a long period.
Can You Clean a Burnt Coil?
You can attempt to clean a burnt coil, but only to stall its inevitable end. Chances are even after cleaning them the best you can, they will still need to be replaced if the bad taste remains. If you have an ultrasonic cleaner like a jewellery machine, that’s the best way to know for sure if it can be cleaned after burning the coil. Should that unclean darker colour remain, it’s time to wave goodbye and invest in a new one.
Can You Clean Coils With Rubbing Alcohol?
Ethanol is the best pure alcohol example to use for cleaning your tank or coils. A cheap vodka soak can also work wonders. However, we advise against using rubbing alcohols like Isopropyl. If any remains on your key components, it could not only damage your health but also alter the device flavour production significantly.
Top Tips
- Add a little squeezed lemon to remove any stronger burnt elements.
- Alternatively, mixing water with a tiny amount of washing up liquid can help to remove stains.
- To quickly dry your device components after a deep clean or simple rinse, use a hairdryer on a lower heat.
- You could also deep clean by soaking in PG liquid.
- Finally, we can’t stress this enough - do not put your batteries in water. If you need to clean them, wipe away any dirt with a dry cloth.
What Happens if I Put Alcohol in My Vape?
Leaving any remains of cleaning alcohol in your vape can happen, but it should be avoided. Doing so can cause serious damage to the body. You can find out more here.
How To Clean Vape Tank
Whether you use a box mod, vaping pod or vape pen, cleaning the tank is easily done and keeps your flavours at optimum levels. You can follow a similar process to cleaning your vape mod tank as you do with your coils. Alternatively, try adding a little baking soda as an alternative to clean the tank.
However, with a vaporiser pen or ‘cigalike’, it’s a slightly different process. Because these components are much smaller and sometimes not even possible to remove individually, you can simply clean with a cotton bud soaked in PG or with a cloth. Be careful not to get any water on electrical parts or the buttons of the device to avoid damage.
How Often Should I Clean My Vape Tank?
Doing so once a week should be sufficient enough to keep the flavours clean and enjoyable. As we said earlier, you do not want to mix them to keep each e-liquid as pure and natural as possible. Rinsing out your tank regularly and deep cleaning often will not only improve flavour but avoid gunk build up. Remember to always dry all parts completely before beginning to vape again!
When to Replace Vape Tank
Replacing your tank isn’t needed as often as replacing your coils unless there is major damage like a hole causing leakages.
However, to keep up with the times, developers often bring out a variety of tanks which can complement your experience.
Whether you seek larger vapour production or intensified flavours with adjusted airflow control or temperature alteration, tanks are important for the overall experience.
The aim is to always keep your device at optimum performance by looking after your vape. Never fill up the tank too high with e-liquid.
Plus, don’t allow the tank to dry up with no e-liquid for too long either.
However, if they get clogged up, which is particularly the case with high VG e-liquids and Sub-Ohm tanks, you’ll need to sort this issue.
Otherwise, vapour production will be down and your airflow vents will get blocked, leading to much smaller clouds.
Unfortunately, like all good things the life of your tank will come to an end it is time to purchase a new tank for your vape mod
|
What kind of vaper are you? The type who likes to get involved with a ‘Do It Yourself’ approach, changing the coils, wick and everything in between to get the optimum performance from your vape. Or do you want little fuss and no fiddly components to deal with? Coils are a vital component of any device and there are two key types - replaceable and rebuildable. |